Before you begin, you have two distinct paths to choose from for this project:
Path 1: Call a Professional (Avoid the DIY Hassles) If dealing with electrical wires, heavy motors, and preventing water leaks sounds like too much of a headache, let the experts handle it. For the best Kitchen Plumbing in Vancouver, trust the licensed professionals at VPS. We will quickly and safely manage the entire removal, re-piping, and disposal process for you so you can enjoy your upgraded sink with zero stress.
Path 2: The DIY Route (Do It Yourself) While taking out a garburator requires a bit of elbow grease, it is a manageable project for a handy homeowner. If you are ready to roll up your sleeves and do it manually, here is your step-by-step guide to safely removing your garburator and reclaiming the space under your kitchen sink.
Phase 1: Context & Preparation
Before you touch a single pipe, preparation is critical. Safety comes first: you must completely turn off the power to the garbage disposal at your home’s main electrical breaker panel. Never rely solely on the wall switch.
Gather the following tools before you begin so you don’t find yourself running to the hardware store halfway through the job:
- A bucket and several old rags (to catch inevitable spills)
- Flathead and Phillips head screwdrivers
- An Allen wrench (or the specific garburator “wrenchette” that came with the unit)
- Fresh plumber’s putty
- A new standard sink basket strainer
- A continuous waste pipe/PVC piping kit (to bridge the new gap between the sink and the P-trap)
- Channel-lock pliers
Phase 2: Disconnection
Once the power is off at the breaker, you need to isolate the unit.
Electrical Disconnection: Look under the sink. If your garburator simply plugs into a dedicated wall outlet, unplug it. If the unit is hardwired directly into your home’s electrical system, you will need to carefully remove the cover plate on the bottom of the unit, untwist the wire nuts, and disconnect the wires. Note: If you are dealing with a hardwired unit and feel uncomfortable handling electrical connections, this is the perfect time to call in the professionals at VPS to handle the removal safely.
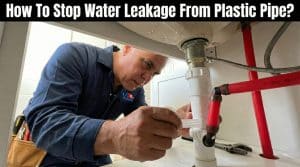
Plumbing Disconnection: Place your bucket directly beneath the garburator and P-trap. First, if you have a dishwasher, loosen the metal hose clamp and slide the dishwasher drain hose off the side nipple of the garburator. Next, use your channel-lock pliers to loosen the slip-nut connecting the garburator’s waste discharge tube to the main plumbing P-trap. Let any residual water drain into your bucket.
Phase 3: Hardware Removal
Now it’s time to extract the heavy machinery.
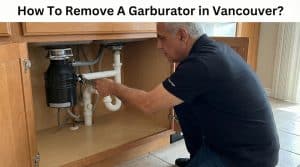
Releasing the Unit: Look at the mounting ring at the very top of the garburator, right where it meets the sink drain. Insert your Allen wrench, wrenchette, or a sturdy screwdriver into one of the designated loops on the lower mounting ring. Turn it counterclockwise to unlock the unit from the sink flange.
Handling the Drop:Warning: Garburator motors are surprisingly heavy. Before you give that locking ring the final twist, be sure you are securely supporting the bottom of the unit with your free hand or a wooden block. When it unlocks, it will drop instantly. Carefully lower it to the cabinet floor and set it aside.
Removing the Sink Flange: From beneath the sink, loosen the three mounting screws holding the upper ring assembly in place. Use a flathead screwdriver to pry off the metal snap ring holding everything together. Once the ring is off, push the old metal sink flange straight up and out through the top of the sink.
Cleanup: Using a putty knife or a rag, meticulously scrape away all the old plumber’s putty from around the sink hole. The surface must be completely clean and dry to ensure your new strainer doesn’t leak.
Phase 4: Re-piping and Sealing
With the old unit gone, you need to restore the plumbing so you can actually use your sink again.
Installing the New Basket Strainer: Roll a generous amount of fresh plumber’s putty between your hands to form a rope about the thickness of a pencil. Wrap this putty rope around the underside lip of your new sink basket strainer. Press the strainer firmly down into the sink drain hole. From underneath the sink, slide on the rubber gasket, friction ring, and locknut. Tighten the locknut firmly with your channel-lock pliers until the excess putty squeezes out into the sink above (wipe this away).
Connecting the New Plumbing: Because the garburator took up a lot of vertical space, you now need to bridge the gap to your P-trap. Measure and cut your new PVC continuous waste pipe to fit.
Dishwasher Integration: If you previously disconnected a dishwasher hose, you must install a “dishwasher branch tailpiece” just beneath your new basket strainer. This special pipe has a side-nipple specifically for sliding your dishwasher hose back on (secure it tightly with a hose clamp).
Reattaching the P-trap: Connect your new tailpiece downward into your existing P-trap. Hand-tighten all the PVC slip-joint nuts, then give them an extra quarter-turn with your pliers.
Leak Testing: Close the sink stopper and fill the basin halfway with water. Pull the stopper and let the water rush down all at once. Take a dry piece of toilet paper or a dry rag and wipe it around every single joint you just connected. If you feel any moisture, gently tighten that specific nut until the leak stops.
Phase 5: Eco-Friendly Disposal
Do not throw your old garburator into your standard household garbage bin!
Metro Vancouver Disposal Rules: Because these appliances contain valuable metal components and electronic waste, they must be recycled properly. Drop off the old motor at a local Metro Vancouver Zero Waste Centre, a designated Return-It electronics depot, or a local scrap metal recycling facility.